


Hi everyone!
I am so sorry that I have been away for so long. I didn't mean to and I'm hoping (despite the upcoming holiday rush) to be back into regular posting within the next week or so. I love and miss you all so much, plus I miss really getting into creating so many things! So in the words of A.A. Milne- TTFN !
Saturday, November 19, 2011
Monday, August 15, 2011
Tranformation
The past few months Transformers have slowly but surely taken over my house and life. All three of my boys (and sometimes my girl too) are absolutely nuts for them. Currently I believe that if forced to choose between saving me or Optimus Prime from some disaster I'm not entirely sure they would choose.
So when my four year old little man told me that I had made my newest project transform I took it as a pretty big compliment.
Here is this old suitcase as I posted it a few weeks ago:
Now here is what it looks like now:


 Now how did I affect the awesome transformation you ask? Well simple. I used some craft paint (Vintage White), some ribbon hot glued around the edges, and some shelf paper. you heard me right, shelf paper (for anyone who has ever seen Johnny Dangerously this quote's for you- 'Rubber Duckies and Bunnies!"). I found the patterned shelf paper at the Dollar Tree and the rest I got from Micheal's on sale and with a 20% off coupon (I absolutely love those!). And here you have it- night and day. Maybe not as good as Optimus Prime, but I sure dig it!
What have all of the rest of you been up to? (besides you Gumbo Soul- I am still jealous over that embroidery machine!) I have finished my project and just putting the finishing touches on my first submission for my column on PaganPages.net and I'll give you guys a little sneak peak later this week. Don't forget to hop over there and check them out- it's a great community and the subscription is free!
So when my four year old little man told me that I had made my newest project transform I took it as a pretty big compliment.
Here is this old suitcase as I posted it a few weeks ago:
 | ||
| it's the brown one in the back |
 |
| here is a picture of the front |
Now here is what it looks like now:


What have all of the rest of you been up to? (besides you Gumbo Soul- I am still jealous over that embroidery machine!) I have finished my project and just putting the finishing touches on my first submission for my column on PaganPages.net and I'll give you guys a little sneak peak later this week. Don't forget to hop over there and check them out- it's a great community and the subscription is free!
Tuesday, August 9, 2011
Something WIckedly Cool This Way Comes
Normally I would be posting my latest creation but I need a couple more days to complete it with my crazy life right now (getting ready for school for the kids AND myself, writing a novel, chasing after 2 little midgets, and working on way to many projects at once- gotta learn to pay attention to my Thrifting Journal). Thankfully though I found a craft recently that is just flat out awesome and the kids have been pretty stoked about it too, so we've been doing quite a bit of it.
It's this really awesome (and awesomely not spendy) Harry Potter Wand how to (<- link) from Your Life Uncommon. This is so cheap and easy to do that once I do the basic filling up of the glue the kids can do the rest pretty much on their own (the older 2 that is- I'm not in any way ready to see my 3 year old holding a glue gun..).
The only really witchy spin that I have put on this for my little witchlets is that while I am filling the tube with glue (and may I suggest you use a high temp glue gun that works well- you don't want to know how I found out that little tip) I have started putting little(very little) folded up pieces of paper with power words that I had the children focus their energy into to sort of 'dedicate' the wands. I also added glass beads (the ones with a flat side that look like drops of glass from the floral section not the kind with the holes through them though you could use those as well..and now I have a new idea, lol) to the swirls on the outside and had the kids say a chant over the wands once they were done. So now they are gathering up quite the array of magickal wands and they were really, really inexpensive!
Go ahead and try this one out, I really recommend it. Considering how many really cool crafts I find out there that I like to put my own witchy spin on I think I might just make this a semiregular feature here on the ol' blog but we'll see.
Happy crafting!
Tuesday, August 2, 2011
Coming Back
Hi all.
Sorry I went offline the past couple weeks, but I really needed to sit back and process what was going on inside my own head. My mother's death was so unexpected I had a whole heap full of feelings drop on me at once. I just kind of shut down for a while. But now I'm back on a more even keel and will be picking up things here where I left off.
I had wanted to wait to announce this until I had my first submission in (which would have been the 20th of this past month but when my mother died on the 14th I pretty much dropped my project and made arrangements to submit it this next month), but I think some good news on here would be great. So without further ado here's my big announcement-
I've been asked to do a monthly column for PaganPages.org !!
The column will be based on this blog and include some Witchy Thrifting projects you haven't seen before. Subscription to the site is free so check it out. I am so honored that they asked me to become part of their family and I figure it will be a whole new experience and a lot of fun!
Sunday, July 17, 2011
An announcement
Due to an unexpected death in the family (my mother), I have been absent the past few days and most likely won't be posting with regularity for the next few weeks. Thinking about doing projects for this blog has been one of the things that has helped me through this and I hope to be posting some finds and project work soon, but I'll need a few days to get back on an even keel. This is a massive shock, and leaves me with a lot more family responsibility that I need to work out how to schedule. Thanks so much for all of your support of this project, and I'll be back as soon as I can be because honestly I love doing this and I need a creative outlet right now like no body's business. Love you all and see you soon.
Wednesday, July 13, 2011
A Little Healthy Competition
Because the hubby and I have finally finished the rest and have decided to have a contest. While you know who did the 2 from the last post, I'm going to post pictures of the other 4 with a letter underneath them. Just leave a comment and include the letter of your favorite and whoever gets the most votes wins! (there is a tiny wager involved here so I'm crossing my fingers because I want to win)
So here we go-


And even though you already know who did them here are the original 2 for consideration in the contest.


So there are all of them. Let the voting commence!
Tuesday, July 12, 2011
A New Award!
Thank you to Tamara over at Riding on A Broomstick has given Witchy Thrifting this lovely award!
 It was so very nice of her to think of me for this and I appreciate it!
And it is quickly followed by my first cop out. Ok, it's not so much a cop out as I just can't pick only a few of you. There are so many wonderful blogs I read and follow, and to me you're all super. So consider all of you nominated!
In other news a lot is going on behind the scenes here at Witchy Thrifting and I'll be make a big(for me) announcement a little later this month. I honestly just can't wait to tell you guys so this whole thing is teasing me a whole lot more than you, lol.
We should be back to our regularly scheduled thrifting tomorrow. I hope you all are being as bombarded with inspiration as I am!
Friday, July 8, 2011
Double Double Boil and Bubble
I found this really awesome little tripod bowl while I was out and about at the thrift shops and one thing popped into my mind
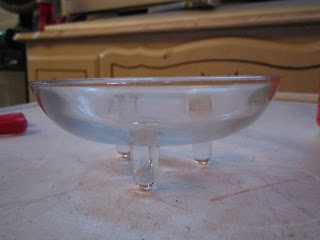 can you guess what it was?
That's right- a cauldron. This little dish reminded me of a little cauldron and I couldn't wait to get started on it.
The technique I chose for this one was to decoupage some metallic grey tissue paper onto the exterior of the bowl using Modge Podge (crafting gift of the Gods!) to give it a 'cast metal' look. This method was not only very cost effective but also gives me the option to change my mind and use a different technique later if I choose to. Since I didn't use a separate sealer, but instead just applied another layer of Modge Podge to the outside to give it a shinier look so the whole thing can come off after washing it with some water. I really wanted to have the option to change it because there are so many different techniques I could do with this one type of projects that I just know one I'm going to get the itch to do at least one other at some point.
 I love how the edges of the paper give it an almost ruff look. This took me about 20 minutes to do (not counting drying time which added about a half hour) and cost me about $3.00 including the bowl. Since it's a glass dish I can use it as a actual cauldron and put cauldron splashes, incense, or burnable offerings in there.
I currently have a pretty big and totally awesome project in the works that I'll be telling you all about in the next couple of weeks (I am super excited) and I can't wait to show you how my 'traveling art trunk' suitcase has turned out!

That's right- a cauldron. This little dish reminded me of a little cauldron and I couldn't wait to get started on it.
The technique I chose for this one was to decoupage some metallic grey tissue paper onto the exterior of the bowl using Modge Podge (crafting gift of the Gods!) to give it a 'cast metal' look. This method was not only very cost effective but also gives me the option to change my mind and use a different technique later if I choose to. Since I didn't use a separate sealer, but instead just applied another layer of Modge Podge to the outside to give it a shinier look so the whole thing can come off after washing it with some water. I really wanted to have the option to change it because there are so many different techniques I could do with this one type of projects that I just know one I'm going to get the itch to do at least one other at some point.

I currently have a pretty big and totally awesome project in the works that I'll be telling you all about in the next couple of weeks (I am super excited) and I can't wait to show you how my 'traveling art trunk' suitcase has turned out!
Tuesday, July 5, 2011
Witchy Prowling Over The Holiday Weekend
This weekend I did some scouting around some new thrift shops in my area (ok- they've been there forever but they were new to me and that's kinda the point of all this huh?). We had a blast and found some cool stuff.
Here's some of the loot that I found. Some of it will be altered eventually and some of it will be left alone.
First up is
 There is a circa 60's jewelry box that I think I'll be using to hold crystals and stones that I find. Also I found a Burberry wallet that HRH is going to absolutely love (I am trying so hard to turn my little fashionista into a thriftinista it isn't even funny- hopefully this find will get me some points).
Then there is my favorite. It is a circa 60's-70's suitcase that I found that's going to be the basis for my own traveling craft trunk ala Aunt Opal and Celia (Thanks again for the inspiration Celia!). It is in awesome condition. Here is a picture of the inside-
 I can't wait to get started on that one!
Also while out hunting I came across some awesome little pitchers. I'm assuming they were for syrup, but I absolutely loved them and will find something to use them for, lol.
 I need to find a way to get the hard water stains out of the really round one, but I'm sure I'll come up with something! Oh and I found a whole bag of those lovely glass beads that you see there, so I think I'll be whipping up a few sets of runes. I think I smell a giveaway coming soon, lol.
Oh and I forgot to take a picture of it but I grabbed an awesome Oster blender too. With all the weekend /holiday sales going on I got everything for less than $20 and had a lot of fun doing it too!
Here's some of the loot that I found. Some of it will be altered eventually and some of it will be left alone.
First up is

Then there is my favorite. It is a circa 60's-70's suitcase that I found that's going to be the basis for my own traveling craft trunk ala Aunt Opal and Celia (Thanks again for the inspiration Celia!). It is in awesome condition. Here is a picture of the inside-

Also while out hunting I came across some awesome little pitchers. I'm assuming they were for syrup, but I absolutely loved them and will find something to use them for, lol.

Oh and I forgot to take a picture of it but I grabbed an awesome Oster blender too. With all the weekend /holiday sales going on I got everything for less than $20 and had a lot of fun doing it too!
Thursday, June 30, 2011
Swish, Swish, Poof!
Sorry this is so late but Blogger and Firefox conspired to make my past 2 days miserable, sigh. But I'm back up and running now so whoohoo!
I was going to do my utensil into wand project in order of the seasons starting with Winter and moving on to spring then summer and so on, but lately fall has really been calling to me. I've been doing a lot of dreaming about fall weather and leaves changing color (not that I actually know what that looks like- but hey a girl can dream can't she?) and really getting excited for Halloween. So Autumn jumped the ship and swam out ahead.
Now I used a new technique that I had never used before on these and it turned out pretty well I think.
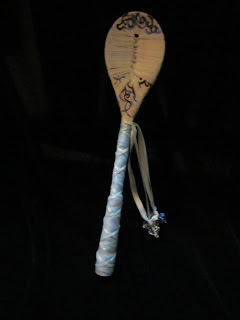
The slats in the wooden spatulas kept making me think of trees, so I used a wood burning tool to burn the lines and a few small details for the trees in (ever since Gumbo Soul over at Witchy Gumbo posted her wood burned spoons I've been dying to try it). Then I used some watered down acrylic paints to wash color on for leaves and grass and then added some details in.
 Then I wrapped the handle in some pretty ribbon that reminded me of fall. Next I knotted some red and orange cording and made a chain of knot work that I wrapped around the handle and glued into place. It reminded me of falling leaves. Here's what the whole thing looks like.

Since I'm doing these in pairs I worked on one of the forks next. Whenever I think of fall the first thing I think of is Halloween. While I was trying diligently to draw a rabbit for spring (I've really been wanting to do an animal for the forks- the prongs just make me think of ears, lol) a little cat kept peeping out at me. So I gave in and let the cat shine through. And what's more Halloween than a black cat?
I used the same technique of wood burning the basic details in and then acrylic washing the main blocks of color in and then going back with solid acrylics for some of the smaller details.
 Then I used the same gold and pink graded ribbon to wrap the handle but added a cross wrap of thin black ribbon, double wrapping it at the top and adding a charm bead to mimic a collar and tag for my little kitty.

so yet again, sorry. This was supposed to go up yesterday morning but the internet was fighting with me. We've since made up and all should be running smoothly from now on !
I was going to do my utensil into wand project in order of the seasons starting with Winter and moving on to spring then summer and so on, but lately fall has really been calling to me. I've been doing a lot of dreaming about fall weather and leaves changing color (not that I actually know what that looks like- but hey a girl can dream can't she?) and really getting excited for Halloween. So Autumn jumped the ship and swam out ahead.
Now I used a new technique that I had never used before on these and it turned out pretty well I think.
The slats in the wooden spatulas kept making me think of trees, so I used a wood burning tool to burn the lines and a few small details for the trees in (ever since Gumbo Soul over at Witchy Gumbo posted her wood burned spoons I've been dying to try it). Then I used some watered down acrylic paints to wash color on for leaves and grass and then added some details in.


Since I'm doing these in pairs I worked on one of the forks next. Whenever I think of fall the first thing I think of is Halloween. While I was trying diligently to draw a rabbit for spring (I've really been wanting to do an animal for the forks- the prongs just make me think of ears, lol) a little cat kept peeping out at me. So I gave in and let the cat shine through. And what's more Halloween than a black cat?
I used the same technique of wood burning the basic details in and then acrylic washing the main blocks of color in and then going back with solid acrylics for some of the smaller details.


so yet again, sorry. This was supposed to go up yesterday morning but the internet was fighting with me. We've since made up and all should be running smoothly from now on !
Monday, June 27, 2011
My First Award!
Magaly over at Pagan Culture was absolutely sweet enough to give Witchy Thrifting it's very first award!
 Now to me sweet has a couple different meanings. There's sweet as in 'aawwww how sweet', and then there's sweet in the Dude Where's My Car sense (yes I'm that kind of geek, lol), you know sweet. So I'm going to stick with Magaly's 2 groups of 3 rules, but I'm going to pick an "awwwww how sweet' group and a sweet group.
This first group are a bunch of bloggers that while sweet in their own ways tend to give me the warm fuzzies on a regular basis:
Tamara over at Riding on A Broomstick. She's a really sweet lady and if you guys haven't heard of the plight of Marvin yet then head on over and help us send some peace to the poor little gator before he gets sent to the summerlands.
Gumbo Soul over at Witchy Gumbo is one of the sweetest ladies I've ever met and so very talented that sometimes I hate her for it. If you like her creations remember to check out her business FB page so you can get some for yourself =).
Robin Larkspur over at Wiccan Writes is one of the sweetest gardeners around in both senses. She's working on an absolutely magical garden for her daughters wedding that is absolutely beautiful!
Now this second group are a bunch of women that I would totally envision having an argument about tattoos with:
Dark Mother over at Dark Mother Goddess is completely bad @$$ and totally sweet. She kicks butt and doesn't even bother to find out the names...
Leanna from Can We Have A New Witch Ours Melted totally gives a 'f '. She so totally gives one that it's probably capitalized, italicized, and highlighted, lol.
YellowDog Granny of YellowDog Granny Blog makes getting up on Monday mornings almost worth it to me. She's pretty much how I hope to grow up to be.
So there you have it all, I hope you go and check these ladies out and learn how sweet they all are!
Saturday, June 25, 2011
Custom Prayer Candle Box
I know I dangled a project in front of you a few days ago. Well its finally complete. A custom prayer candle box! We've been working on this for about a week since a lot of the components take a couple days to set.
It started out as this-
 Your basic frames that we found at the thrift store for about $4.00 each (or less).
Then we did this to it.
 After all the staples were removed and the artwork taken out we then painted the frame.

Everything goes with basic black. We used black craft paint and did about 2 coats on all sides. Then I got fancy with the silver leafing and sealed it all with some polyurethane to seal it. Then the Hubster made me a nice little open box to attach to the back which got the black treatment too. I then used epoxy to glue the glass into the frame so that it could be moved without the glass falling out. Then I pulled out the Gallery Glass and the leading blanks and got busy. Here is the final result-

We added a clasp on one side and hinges on the other so that it can be easily opened and secured.
 Since the art is done in Gallery Glass (I know- I should just buy stock in that company, lol) it can be changed whenever you want so you always have a fresh look or change it for the seasons or occasion. You could also use paper as well but I would not suggest using anything flammable if you plan on putting a real candle behind it. This one is actually from a drawing a did a year or so ago that I really wanted to see in actual stained glass. The frame is meant to hang on the wall and you can put small tapers or tea lights (real or electrical just please don't use real ones if your frame is small) to illuminate the artwork so that it looks like this-

 I am really happy with the way this came out, especially since it was a collaboration of ideas and work between me and the Hubster and coming from his initial idea. This will be going on our wall later today as soon as I figure out which wall, lol.
And as you saw we have 2 other frames to experiment with and I think we'll be doing some different takes on this idea that are percolating in my brain as we speak.
So what do you guys think?
It started out as this-

Then we did this to it.


Everything goes with basic black. We used black craft paint and did about 2 coats on all sides. Then I got fancy with the silver leafing and sealed it all with some polyurethane to seal it. Then the Hubster made me a nice little open box to attach to the back which got the black treatment too. I then used epoxy to glue the glass into the frame so that it could be moved without the glass falling out. Then I pulled out the Gallery Glass and the leading blanks and got busy. Here is the final result-

We added a clasp on one side and hinges on the other so that it can be easily opened and secured.


And as you saw we have 2 other frames to experiment with and I think we'll be doing some different takes on this idea that are percolating in my brain as we speak.
So what do you guys think?
Friday, June 24, 2011
Why Thrift?
Why would I love to go to ratty old thrift shops, or paw through the stuff that other people didn't want on their front lawn?
Why Thrift?
My answer to that is simple, yet complicated. The simple answer is because it brings me joy. It brings me joy to hunt through the shop in search of that piece that will spark my interest and get my creative juices flowing. It brings me joy to take those pieces home and in some way transform them.
The complicated answer is, well complicated. One part of it is that walking through a store and seeing pieces of other peoples' lives displayed trips my curiosity. It makes me wonder about them and what drew them to the objects in the first place. Why did someone own a green leather jewelry case and what did they keep in it? Why would someone have 15 different cat mugs? What color wall would match fuchsia shelves?You can develop a very interesting view of humanity by looking at what they thought was too precious to throw away. Because that is in essence what you find in thrift shops and yard sales. The things that people couldn't stand to see thrown away but can no longer keep themselves. Sometimes they are things a relative has left them after passing, some times they are things that they need to get rid of to make room for new things to love, but no matter why they are giving these things up at some point someone cared enough about them to have kept them in their home and did not want to see them completely discarded. Which means when I go to pick them up and take them home I am taking on a bit of a trust, to take these things that someone cared about and make them into something that my family will make part of our home, and someday when we are done with them they will return to the thrift store for someone else to find and make part of their home.
Another part of it is being able to let my creativity run as wild as I want it to. Would I experiment and try gluing random things to a brand new item that I bought at a store? No way. What if it didn't turn out? What if I ruined this item I just spent $10-15 on? I just wouldn't do it. I would keep my ideas bottled up and think about what I would do if I hadn't paid that much for the item. Buying items at thrift store and yard sale prices allows me to be as experimental and creative as I want with them without feeling guilty about spending some of my family's tight budget on a project that may not work out how I see it in my head (and trust me there are plenty of those, lol).
And yet another part of it is my own sense of responsibility to Mother Earth (or Gaea, or whatever name you have for her). Everything that we as humans make or use comes in some way from her. It is either dug from her soil, cut while it is growing from her, or taken from her seas or sky. No human made product is in reality a product of only ourselves. All of our creations are a product of her substance and our imagination. As we all know there is only so much of this that our Mother is going to be able to stand before too much damage is done. By finding these items and re using them I am, in a very small way, taking something out of the create and discard cycle that our society has created for itself. And I am honoring Mother Earth by not allowing the things we have taken from her to be discarded as worthless.
So as I said, it's simple and it's complicated- but it's also a lot of fun!
Wednesday, June 22, 2011
Stars and Fire Equals Thrifty Fun
There's a bigger project I'm working on that is almost complete and I hope to finish it up in time to make it my next post so fingers crossed and light a candle that the glue holds (just you know, not too near the glue, lol). But while I play around with epoxy and screwdrivers here's a cute little project I completed on the side.
I was lucky enough on one of my jaunts to the thrift store to find some candle holders that were an awesome 5 pointed star shape. They had a lot of them in both taper and tea light sizes (the size of the candle holder thingie on the inside..oh you'll see, lol) and I picked up 3 of each to play with.
Here are a couple that the Hubby and I did over the weekend using the same painting technique with the Gallery Glass. These were clear class before we messed with them.
 This is the one that my Hubster did and I just love the way the orange and red make it look like it's on fire. This is one of the tea light sized ones ( I told you you would see, lol.) The edges are red and when it's placed at the correct level the red seems to radiate up through the glass.
 This one was mine. This is the taper size and I went with a pearlized white with a red border. Like with the other one the red radiates down through the glass, but the white (especially in the thin layer I applied) adds a pearly sheen to it that looks awesome in the candle light.
These were an awesome find, and because they had so many I made multiples and the hubby and I are currently having a contest to see who's ends up looking better. We're both working on 2 more and I may just post them all up here for a vote (that's not the big project I was talking about- I am really excited about that and can't wait to show you guys!) to see who wins. I picked up some really cool colors of Gallery Glass this weekend that I can't wait to see how they turn out. Here's a crafty/thrifting tip- Always check out Michaels and Joanne's websites for coupons. I got a 50% off coupon (for a single item and I picked myself up a $30 wood burning kit for $15- Gumbo Soul really lit a fire under my butt with her gorgeous spoons HERE and I looked for an inexpensive one all over the place but nowhere had any except Michaels) and a 20% off coupon (for the entire purchase including sale items) so taking the 5 minutes to check the websites was totally worth it!
Have you guys been working on any projects?
I was lucky enough on one of my jaunts to the thrift store to find some candle holders that were an awesome 5 pointed star shape. They had a lot of them in both taper and tea light sizes (the size of the candle holder thingie on the inside..oh you'll see, lol) and I picked up 3 of each to play with.
Here are a couple that the Hubby and I did over the weekend using the same painting technique with the Gallery Glass. These were clear class before we messed with them.
These were an awesome find, and because they had so many I made multiples and the hubby and I are currently having a contest to see who's ends up looking better. We're both working on 2 more and I may just post them all up here for a vote (that's not the big project I was talking about- I am really excited about that and can't wait to show you guys!) to see who wins. I picked up some really cool colors of Gallery Glass this weekend that I can't wait to see how they turn out. Here's a crafty/thrifting tip- Always check out Michaels and Joanne's websites for coupons. I got a 50% off coupon (for a single item and I picked myself up a $30 wood burning kit for $15- Gumbo Soul really lit a fire under my butt with her gorgeous spoons HERE and I looked for an inexpensive one all over the place but nowhere had any except Michaels) and a 20% off coupon (for the entire purchase including sale items) so taking the 5 minutes to check the websites was totally worth it!
Have you guys been working on any projects?
Monday, June 20, 2011
On the Hunt: Thrift Stores
Since I've spent the weekend working on projects that haven't finished up yet and will be revealing throughout the week I figured I'd repost this since I put it up before I bothered to tell anyone about this little project. Enjoy!
One of the great things about getting Thrifty with it is- dun dun dun...The Hunt!
One of my favorite hunting grounds is your local thrift store. There are thousands of these fine establishments all across the US and a quick internet search should give you at least a few in your area to choose from. They range from privately owned, to church owned, to big charity ones like the Salvation Army or the Goodwill.
Some people don't like to give their patronage to a church or religiously affiliated establishment if they wouldn't feel comfortable giving that same organization a cash donation. Personally I at least give these places a browse through because I love the irony of using something that I paid them pittance for to make a beautiful magical object (but then I can be a witch that way).
The first thing I would do is check my Thrifting Journal (the link to that post is HERE) and my current list of projects so that I know what I've currently got going. Keeping track of what is already on your plate can help you judge how much room is left for new projects or if you need more supplies for current projects.
The second thing I would do is set myself a limit. And I don't just mean a monetary one. Once you open up that inner eye to see all of what is available it is really hard not to want to scoop everything up and get started on pixie dusting it into witchy perfection right away. I have to constantly look not just at what money I have available but what time and space I have as well. It's ok to indulge if you see a great deal on an item for a project you have in mind to do later, but make sure that you have the space to store the item without making it clutter and then make sure to put it on the list of projects in your Thrifting Journal so it doesn't get put up and forgotten.
With those two things done it's time to get out there and indulge in the thrill of the hunt.
Open up that inner eye(the link for that post is HERE) and let your imagination run. Prowl through the aisles, dig through the bargain bins, and claim the prize that grabs your intuition. Don't plan a route through the store, just wander letting whatever catches your attention pull you. Just keep in mind that these items have lived with people before and can carry some of their energy. Listen to your intuition. If something seems wrong or 'off' about an item you might want to leave it behind no matter how perfect it seems for your project. I also suggest doing a cleansing of any object purchased second hand whether it feels like it needs it or not. Just like you would strip of that hideous paint, it is always best to start with a blank psychic/spiritual slate.
Get out there and find that diamond in the rough*!
*Cave of wonders and hunky street rat with great hair not included
Friday, June 17, 2011
Glass for The Gallery
Amongst the prizes that I have found in the past couple weeks were a couple gorgeous cut glass styled bowls.
 I just loved the shapes and designs in this totally sparked off an idea and had me pulling out the Gallery Glass tubes. If you've never heard of it before Gallery Glass is a product that is kinda like liquid stained glass. I've used it before and it's a lot of fun. Usually you plan out a design just like with real stained glass and then squeeze the design out onto a plastic sheet and let it dry then peel it off and stick it where you want it to go. I decided to try a new technique and use the product directly on the glass.
We used paint brushes and in some places just squeezed it directly onto the bowls. The brush strokes didn't show in the final product and they ended up looking pretty nice if I do say so myself. One of the really nice things about this is that if you don't like how it turns out you can just peel it back off and start over.
Here are a the bowls that the Hubby and I did.
 This one was mine. I painted in the red with a paint brush and then did several layers of charcoal black to get the smoked glass effect, leaving only the very top rim clear. This would be perfect for an offering dish, or a potpourri dish.
 This one was the Hubsters and was a lot more involved as to the painting. He did each of the different layers separately and then ended with a pearlescent white to finish off the top. he also left the very bottom clear which allows it to be used in this set up-
 Just add a tea light underneath and you have an oil diffuser!
I picked the bowls up for $1.25 each, and the stand for $0.85. I already had the paints so in total these bowls cost me about $3.00 for both of them!

We used paint brushes and in some places just squeezed it directly onto the bowls. The brush strokes didn't show in the final product and they ended up looking pretty nice if I do say so myself. One of the really nice things about this is that if you don't like how it turns out you can just peel it back off and start over.
Here are a the bowls that the Hubby and I did.


I picked the bowls up for $1.25 each, and the stand for $0.85. I already had the paints so in total these bowls cost me about $3.00 for both of them!
Wednesday, June 15, 2011
Bibbity Bobbity...BOO!
Sorry but every time I think of magic wands I think of that song. I even know all the words, but my Disney geekiness is a post for another day.
This post is about a craft that I started up this weekend.
Now I have found that my local 99 cent store is an excellent resource. If you haven't been in your local Dollar Store take a little trip and check it out. Besides having some great deals on items that you can use to spiffy up your unique thrifty finds it's also a great source for prototypes. If I have a project idea that I'm not quite sure about I can usually find a substitute object from this mecca of deals that I won't mind trying something out on to see how it looks before I try that technique on a thrifted, one of a kind item.
That's what I did this weekend. I picked up these-
 I know, what on earth could I be doing with these?
Well I had an idea to use kitchen utensils as magic wands (bibbity bobbity bibbity bobbity...BOO!). Crazy right?
I liked the idea of working in wood as I could do so many different types of treatments to it. I started off with paint, a little glitter, and ribbon.
Here's how it looked after my first step- painting the head.

I decided since I had 8 of these I would do 2 at a time and do a seasonal/ moon phase thing. so this one is my full moon/winter set.
Next I wrapped the handle part in a ribbon. I picked up a bunch of ribbon on sale this weekend at Micheals and this was one that I really liked, even if it did get glitter all over me.
 Then it was time to take care of those slats in the top of the spoon. I wrapped ribbon around and through it making a weave pattern on the head of the spoon.
 I ended the weave by sliding the end of the ribbon down through the center and then wrapped the ends around where the blue ribbon met the white paint and tied them off. Then I took a thin light blue ribbon and cross wrapped it around the blue glittery ribbon on the handle, tied it off at the same point as the whit ribbon and then tied some wire wrapped blue beads at the ribbon ends to finish them off.
 And here is my finished Full Moon Wand...drum roll please.....
 And because I said I was doing them in duo's here is my Winter Wand, done using the same techniques!
 These turned out really well. I was surprised by how well they ended up feeling in my hand. And the awesome part is that I can use these as decorations or even play/dress up wands for the kids.
This post is about a craft that I started up this weekend.
Now I have found that my local 99 cent store is an excellent resource. If you haven't been in your local Dollar Store take a little trip and check it out. Besides having some great deals on items that you can use to spiffy up your unique thrifty finds it's also a great source for prototypes. If I have a project idea that I'm not quite sure about I can usually find a substitute object from this mecca of deals that I won't mind trying something out on to see how it looks before I try that technique on a thrifted, one of a kind item.
That's what I did this weekend. I picked up these-

Well I had an idea to use kitchen utensils as magic wands (bibbity bobbity bibbity bobbity...BOO!). Crazy right?
I liked the idea of working in wood as I could do so many different types of treatments to it. I started off with paint, a little glitter, and ribbon.
Here's how it looked after my first step- painting the head.

I decided since I had 8 of these I would do 2 at a time and do a seasonal/ moon phase thing. so this one is my full moon/winter set.
Next I wrapped the handle part in a ribbon. I picked up a bunch of ribbon on sale this weekend at Micheals and this was one that I really liked, even if it did get glitter all over me.


Monday, June 13, 2011
Spiritual Hygiene- A Word About Cleansing
It's time for everyone to sit back in their desk and pretend to pay attention to the annoying and embarassing grainy public service announcement that the teacher is about to play- but hey it's better than algebra right?
Ok so it's not that bad, lol. We here at Witchy Thrifting take our Spiritual Hygiene very seriously. While we're out there hunting for those special pieces we need to remember that we can bring home more than just a bargain.
Just by living we imprint ourselves and our spiritual energy on our belongings every day. This is not a bad thing, and many items you find out there will be filled with some awesome energy from it's former owners. These are usually the objects that I'm most drawn to, and if I'm looking at using them for a decoration or a furniture piece for the house I find that it's nice to live with different flavors of positivity. But if I'm planning on using it for a ritual item, or it has a negative vibe but I find I just have to have it I've found a good cleansing before I start to work on it makes a world of difference.
There are a lot of cleansing spells and rituals out there, and a quick google can give you a whole bunch of them to choose from. I can't speak for anyone else, but for me I've found them pretty similar and generally whatever feels right to you will be the most effective. I am really rather minimalist in my workings so my cleansings tend to be pretty utilitarian. I am definitely a function over form girl and while I love the odd pretty thing, generally I want things to do a job as well as look fabulous. Therefore a lot of the things that I would need on hand to do a cleansing are pretty innocuous or dual purpose.
These are a couple of my cleansing rituals that I do for any items that I bring home and think need a little spiritual hygiene.
Cleansing smaller items can be done singly or in a batch, it really depends on how many pieces you have and what method you use but I would suggest cleansing larger pieces or ones with large doses of negativity seperately. Take a moment to look at what your items are made of. Not all methods work well with different materials. For instance if you're cleansing something painted then (depending on the type of paint or finish) salt may damage your item. Same goes with smudge smoke and fabric. It is no fun to get your new beauty's energy all nice and clean only find that it got damaged in the spiritual wash. Once you know what to avoid for your particular items it's time to rub a dub and scrub that energy clean!
This is my quick go to for items that only need a cursory cleansing. That's items that either have a really weak energy residue or are not strongly shooting off negativity.
One of the first things I do is set my spiritual boundaries. For me this is a the space that I want to keep separated from the rest of the world for however long it takes me to accomplish my task. Many people and traditions consider this their circle and have a casting ritual that they follow. The following is my method and it works for me but to each their own.
To begin this I start a light meditation. Once I feel comfortable and relaxed I envision a circle surrounding myself and the objects I will be working with. Then I picture the circle turning in to a sphere, kinda like the dome on a space helmet clicking in place (that's the best way I can describe it, lol). Now I'm in my own little ball of protected space that keep the energies I want in but lets the negativity out. It's very important I tell myself the properties of my little spiritual 'hypershield' so that it knows what I need it to do. Now that my area is prepped I need to start focusing on myself. I need to 'feel' myself in every part of my body. In every cell. I always feel like I'm humming all over during this part.
Next I focus on the items to be cleansed. I don't tend to be specific about night vs. day so I work with whatever astral being is in the sky at the time that I am doing my cleansing. For descriptive purposes we'll go with daytime for this. The first step I need to take for this part is to keep a picture of these items in my mind. Sometimes I stare at the items for a while memorizing their shape and coloring, or I'll pick them up and turn them this way and that taking in all their angles. Now I visualize a waterfall of golden fiery liquid pouring out of the sky and directly onto my head. This liquid pours into me like I'm an empty vessel and I see it filling me up to the top with a golden glow that spreads out to the very tips of my fingers and toes. I fill up on this liquid until I can't hold anymore then I let it leak out through the center of my chest until I have a good amount of it gathered. Then I mentally 'flow' the liquid to the object that I want to cleanse. I pool the golden energy around the item until it is submerged completely. Now to get 'clean' the object I start pushing the golden liquid into the item. I push the liquid in until it pushes all the negativity or spiritual residue out and there is nothing left but the golden glow suffusing the item. Then I release the golden energy to go back to it's source. I repeat this for as many items as I have with me, constantly refilling myself with the golden liquid as it drains out, creating a circle of energy passing from the sun to me, to the item, and back to the sun.
This is the basic cleansing I do on a regular basis not just for items that I pick up but for myself and my house. Sometimes I substitute the moon's silver energy for the sun's golden energy. Sometimes I add special stones that I charged the last cycle of the moon to have on hand, or some toilette water made with cleansing essential oils. Depends on my mood and how much cleansing I think an object needs.
A good rule of thumb for telling if your work has been successful is to put the object in a place that you'll come upon it while going about your daily business at home at odd moments and after a couple days see how you feel about the item now. Really negative things will feel that way right away, so you'll be able to work on those again right away. If you can't wait to work on that project you picked the item up for you can always finish up your project and if it needs another cleansing you can cleanse an charge it again at any time whether you've altered it or not.
Homework is due on Friday, remember to keep your energy nice and clean, and their will be a pop quiz on Wednesday. Class Dismissed!
Friday, June 10, 2011
Thursday Thrifting
Well yesterday I took the kidlets out to the park with their aunt and grandma and we ended up taking a detour on the way home to a thrift shop (isn't that always the way, lol). We ended up going to the one that I consider my go to for large furniture and wood goods.
The boys got a nifty semi truck hot wheels carrier and I picked up a couple little tidbits for myself.
First to show if is this lovely bread box.
 Got this little lovely for $6.00 and I love it! We have really limited kitchen storage and I've been looking for a bread box that would fit and allow us to still put a couple little things on top so this one was about perfect.
Next up was actually a fairly quick and easy redo that I did this afternoon with the boys.
Originally it looked like this-

 I seemed to be finding the light wood yesterday. But this little beauty was originally $5.99 but they were having 50% off orange and white tags yesterday and this baby had a white one so I got it for $3.00. Now this was in great condition but I don't really dig on the light wood so I decided to do a little refurbishing on it with some fabric and modge podge.
Here's the finished product-

I found some pictures I liked and shrunk them down then cut them out to put in the frames on the lid.
Then I took some cool halloween fabric I had hanging around and cut some strips out and modge podged them on like this-
 So now I have this gorgeous trinket/ jewelry/ ritual accessory box that cost me less than $10 and suits my witchy style so much better!
The boys got a nifty semi truck hot wheels carrier and I picked up a couple little tidbits for myself.
First to show if is this lovely bread box.

Next up was actually a fairly quick and easy redo that I did this afternoon with the boys.
Originally it looked like this-


Here's the finished product-

I found some pictures I liked and shrunk them down then cut them out to put in the frames on the lid.
Then I took some cool halloween fabric I had hanging around and cut some strips out and modge podged them on like this-

Wednesday, June 8, 2011
Witch on The Prowl
I was out cruising through one of my local thrift shops this past weekend and found quite a few little gems that I did a few squee's over, lol.
Now this store was a prime example of a bad experience replaced by a good one. The first two times that I entered this establishment one of my littleminions destructobots helpers threw huge fits that made it impossible to even look through the merchandise. They were not a good experience. But I decided to give this shop another try this past weekend, and with a little strategy between my husband and I, I got to do a really good look through and was highly impressed.
This shop is now going to go on my list of best places to look for glassware. Their selection was varied and very well priced. I walked away with most pieces for under a dollar and didn't pay more than two dollars for any of it. And I found some seriously cool stuff.
While I'm waiting to post the pics of my projects until they are complete I couldn't wait any longer to show off a couple of my finds that I think I'm going to leave as is.
Here is a mirror that I found that I really loved.
 I found this little gem in the picture frame section and picked it up for $1.50. It's hand sized so I think I may either use it to decorate my altar space, or I may try and smoke out the glass and use it for a scrying mirror. I just love the frame the way it is so I don't think I'll do much to it if anything.
And here's one of my favorite finds of the day. I spotted it on a low shelf and just had to have it!
 It's a flat disc of glass that looks almost black from above. It looks like a smooth pool of deep dark water and I love it! I'm assuming that it was originally a paper wieght but I think it would make a great alternative to a charcoal disk for incense and stuff. And one of the coolest things is if you hold it up to the light like this-
 It's actually a deep green color that looks awesome in different lighting. It's also about two inches tall and has a concave spot on the bottom so it's got a really nice shape. I picked this unique little trinket up for $1.25 and I absolutely adore it!
Now this store was a prime example of a bad experience replaced by a good one. The first two times that I entered this establishment one of my little
This shop is now going to go on my list of best places to look for glassware. Their selection was varied and very well priced. I walked away with most pieces for under a dollar and didn't pay more than two dollars for any of it. And I found some seriously cool stuff.
While I'm waiting to post the pics of my projects until they are complete I couldn't wait any longer to show off a couple of my finds that I think I'm going to leave as is.
Here is a mirror that I found that I really loved.

And here's one of my favorite finds of the day. I spotted it on a low shelf and just had to have it!


Subscribe to:
Posts (Atom)
